Plug-ins
This section contains information for extending ASPIDE with User-defined plugins. The page offers a list of available plug-ins, a small tutorial to import a plug-in in ASPIDE and a manual for creating new User-defined plugins by exploiting our ASPIDE SDK for Plug-ins development.To get the "ASPIDE SDK for Plug-ins development", open ASPIDE and download it by using the menu Help -> Get SDK for Plug-ins development. The SDK is distributed under the LGPL Licence.
Available Plug-ins
In the following table there are a list of plug-in libraries that you can install in ASPIDE. For each plug-in library the table shows the kind of plug-ins (Input, Rewriting, Output), other (if any) needed libraries and a short description of the plug-in library.To install the plug-ins open ASPIDE, use the menu File -> Plug-ins -> Available Plug-ins; on the opened dialog click on Get Plug-ins button and install plug-ins that you prefer. If you have problem on this process, please contact us.
| Plug-in Name | Version | Author | Plug-in Type | Other Needed Libraries |
Licence | Description |
| ASPIDE CQA Rewriter | 1.0 | Daniela
Nicotera Kristian Reale |
INPUT, REWRITING | cqaRewriter-1.0.jar AutoCompleteRsyntaxtextarea.jar rsyntaxtextarea.jar jdom-2.0.5.jar |
This plug-in is useful in a data integration specific context where different data sources need to be combined providing the user with a unified view of them, called Global Schema. In such a way integrated data may violate global integrity constraints even in the presence of locally consistent data sources. In order to retrieve as much consistent information as possible, the plug-in exploits algorithms for consistent query answering (CQA) under different semantics (sound, complete, exact, or a variant of them). The algorithms rewrites a query and generates an Answer-Set Program (more or less efficient, in accordance of the semantic) for computing consistent answers to the query. |
|
|
ASPIDE Protégé
|
1.0 | Kristian
Reale Barbara Nardi |
INPUT,OUTPUT | - |
The plugin enables a bidirectional connection between ASPIDE and the ontology editor Protégé. Requires to download Protégé from http://protege.stanford.edu/ -Install aspide_protege-1.0.jar in ASPIDE -Install it.unical.mat.aspide.protege-0.2.jar in Protégé |
|
| ASPIDE OWL to Facts |
1.0 | Pierfrancesco Veltri | REWRITING | openrdf-sesame-2.5.1-onejar.jar
slf4j-api-1.6.2.jar |
Rewriting plugin creating a Datalog view in term of facts representing the ABox of an ontology |
|
| ASPIDE OWL to DLVEx | 1.1 | Pierfrancesco Veltri | REWRITING | owlapi-distribution-3.4.3-bin.jar | Rewriting plugin creating a Datalog Exist program out of an OWL ontology (supports DL-Lite only) |
|
| Presto | 1.0 | Onofrio Febbraro | REWRITING | QueryReformulator.jar | Rewriting plugin exploiting the Presto query rewriter for query answering on lightweight ontologies. -Put the QueryReformulator.jar library in the folder .aspide/plugins/lib located in your home folder |
|
| Requiem | 1.1 | Kristian Reale | REWRITING | requiem.jar postgresql-8.4-701.jdbc3.jar owlapi-bin.jar mysql-connector-java-5.1.10-bin.jar HermiT.jar antlr-3.1.jar |
Rewriting plugin exploiting the Requiem query rewriter for query answering on lightweight ontologies. Requires to download Requiem from http://www.cs.ox.ac.uk/isg/tools/Requiem/ -Put the requiem.jar library in the folder .aspide/plugins and the other libraries in the folder .aspide/plugins/lib located in your home folder |
|
ASPIDE Rule Projector |
1.0 |
Kristian
Reale |
REWRITING |
- |
A rewriting plug-in for reducing the number of variables in a rule; in particular the plug-in eliminates variables with isolated occurrences and replaces the encompassing literal(s) with a new literal only containing the remaining variables. |
|
|---|---|---|---|---|---|---|
ASPIDE ASP RuleML Handler |
1.0 |
Kristian
Reale |
INPUT, REWRITING |
- |
An input plug-in for handling and loading files containing program written on the ASP RuleML syntax. The goal is to allow ASPIDE to read an ASP RuleML program and to open it in two modalities: (i) in the original format, so that an editor, working as XML editor, shows the content of the file; (ii) in its ASP version, so that an editor, working as ASP editor, shows the program using the usual ASP syntax. |
|
ASPIDE ASP Shifter |
1.0 |
Onofrio
Febbraro |
REWRITING |
-
|
This plug-in allows one to rewrite disjunctive rules in order to obtain a “shifted” version, where disjunction is replaced by cyclic nonmonotonic negation. (This rewriting produces an equivalent encoding in case of Head-Cycle Free programs). For example, rule a v b is rewritten in a :- not b. and b : not a., the intuition here is that “disjunction is shifted in the body”. |
|
ASPIDE
Custom XML Output Converter |
1.0 |
Kristian
Reale |
OUTPUT |
-
|
This plug-in captures the answer sets generated by the DLV solver and rewrites them in a custom XML format to be shown in the Console Window of ASPIDE. |
The plug-ins can be also downloaded directly from ASPIDE in the following way:
- Use the menu File -> Plug-ins -> Available Plug-ins
- Click on the Get Plug-ins button of the dialog window
- Install the plug-ins that you prefer
Built-in Plug-ins
The following plug-ins are built-in plug-ins that are alredy available in ASPIDE:- ASPIDE Scripts Executor allows one to execute, from ASPIDE, external scripts that work as rewriters. The plug-in checks a particular folder and shows all the scripts saved in the folder. When the users chooses one script on the rewriting action, ASPIDE executes the script externally passing, as standard input, the content to rewrite. The script must return, as standard output, the rewritten content so that ASPIDE can manage it.
- ASPIDE
Database Source allows one to perform database access in
a user-friendly way. In particular the user can exploit the plug-in to:
- import database table in ASPIDE for mapping them as predicates;
- perform rewriting to TYP directives, annotations and import directives;
- load tuples from databases as facts in ASPIDE;
-
ARVis (get info here) is intended for the visualization of answer sets and their relations by means of a directed graph. Each node in the graph represents an answer set and a directed edge between two answer-sets represents a relation. ASPIDE exploits ARVis as a plug-in and ASP Programs files can be passed to ARVis using either DLV or Potassco format.
Installing a Plug-in in ASPIDE
To use the plug-ins in ASPIDE, you must install them in the following way:- Start ASPIDE, then select Windows > Preferences and select the tab Plug-ins;
- Click New Plugin button
- In the Insert Plugin dialog that appears, you must select the Plug-in Jar file and any libraries that it needs
- Click OK.
- When the installation completes, restart ASPIDE .
Creation and deployment of a new Plug-in
0. Getting Started1. Creating an Input Plug-in
1.1 Exploiting an Example
1.2 Adding more functionalities
2. Creating a Rewriting Plug-in
3. Creating an Output Plug-in
4. Deployment of the Plug-in
0. Getting Started
The plug-ins creation process consists on creating a jar library that can contain one or more plug-ins. Information about every new plug-in, like plug-in name, author name, used libraries and so on, must be available on a xml file than have to be included in the jar library.
Download the last version of the ASPIDE Plug-ins Software Development Kit (SDK) from the Download section. The SDK contains a set of interfaces and supporting classes that you must implement, redefine and use.
1. Creating an Input Plug-in
The goal of an Input Plug-in is to allow ASPIDE to load new kind of files and to manage them in the environment. Files stored in some ASPIDE workspace can be bound with an Input Plug-in so that, new editors can be open, new input formats can be managed and new commands on those files can be introduced.The follow class diagram summarize the interfaces, contained in the SDK, that must be used to create a new Input plug-in. In the next we exploit an example for creating an Input Plug-in. In particular we give by a step-by-step description for the creation of the ASPIDE ASP RuleML Handler plug-in (already available in this page; see description of the plug-in for more details).
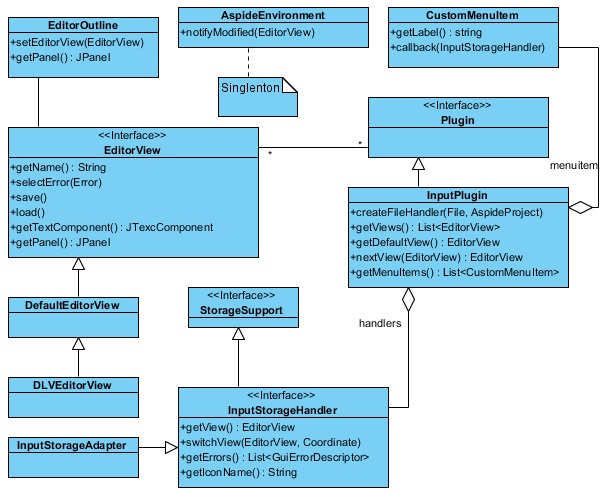
Fig.1. The input plugin interfaces Diagram
1.1 Exploiting an Example
To define this plug-in we develop a new class RuleMLPlugin (the core of our plugin) that implements the interface InputPlugin. We have to specify a class that implements the interface InputStorageHandler and represents our ASP RuleML input file. The interface contains different methods that are used in ASPIDE for many purposes. The SDK gives also a supporting class, named InputStorageAdapter that already implements, in part, InputStorageHandler so that we do not need to be worried about other functionalities that are not important for our purpose. Consequently we choose to create the new class RuleMLProgramHandler that extends InputStorageAdapter.
On the class RuleMLProgramHandler we implement the function getIconName() to return the name of the icon that will be associated to the file. ASPIDE will retrieve the corresponding icon by accessing to the Utils folder that must be contained in the jar library defining our plug-in.
On RuleMLPlugin
we implement the
function createFileHandler that, given an object File
and an object AspideProject (representing a Project
of
ASPIDE), creates a new instance of RuleMLProgramHandler
and returns it to the ASPIDE environment.
For this plug-in, we
need two kind of editors: a simple XML editor, that shows an ASP
RuleML file, and a simple ASP editor that shows the ASP
syntax version of the file. To design the editors we define two
classes named SimpleEditorXML and SimpleEditorASP.
The
classes must implement the interface EditorView.
The SDK gives also more supporting classes that already implement EditorView
and are, in part, implemented with default behaviors. We
exploit these class making the class SimpleEditorXML
to
extend the default class DefaultEditorView
that gives line numbering and a minimal coloring on some keywords
like strings, and the class SimpleEditorASP to
extend the default class DLVEditorView
for the ASP editor that gives some minimal auto-completion and more
coloring for DLV keywords like 'v'
and 'not'.
The editors that we have just designed need to be managed by ASPIDE. To do this we implement, in RuleMLPlugin, the functions:
- getViews() to return the editor views of the plug-in (in this case SimpleEditorXML and SimpleEditorASP);
- nextView(EditorView) to return the EditorView that is the successor of the passed EditorView (this is useful when in ASPIDE the user has open an editor and he or she wants to switch explicitly to an other editor of the same plug-in);
- getDefaultView() to return the editor view that we want to consider as default (in this case we consider SimpleEditorASP as default).
When the content of an editor changes, the editing must be notified to the ASPIDE environment, so that the GUI can, for example, say to the user that the file can be saved. To notify editing, we add a caret listener on both the JEditorPane instances of the editor views, containing a call to the method notifyModified(EditorView) of the singleton class AspideEnvironment.
The next step of the creation of the ASP RuleML plug-in is the saving and the loading process of an editor view content. When the user opens or saves the content of an editor view in ASPIDE, the load() and save() methods of EditorView are called.
If the editor view is a SimpleEditorXML, the method save (load) has to save (load) the pure content of the editor (file), because it is already on the ASP RuleML format. If the editor view is a SimpleEditorASP, the load method consists on translating the content of the file in the ASP format and to show the translated program on the editor. On the other hand, the save method consists on translating the content of the editor (written in the ASP syntax) to the ASP RuleML syntax before the writing to the file. As a consequence we need to implement a rewriting procedure that exploits a rewriting plugin (see next section for a detailed description of the rewriting plugin creation).
For this purpose we make our class RuleMLPlugin to extend also the class RewritingAdapter (fig. 2) that contains a method, to be implemented, supporting the rewriting. We override the method to make a rewriting procedure from ASP RuleML format to ASP format. Finally, we insert, in the class SimpleEditorASP a reference to this rewriting plugin so that the method load can (i) read che content of the file, (ii) rewrite the content in the ASP format using the plugin, (iii) show the rewritten content in the editor.
When a SimpleEditorASP, showing the content in the ASP format, is open in ASPIDE, the saving procedure has to rewrite the program in the ASP RuleML format. To do this we create an other class, named ASPToRuleML, that works as rewriting plugin and translate from ASP to ASP RuleML. We include this new plug-in in SimpleEditorASP and enable the method save to call this new rewriting procedure for getting the ASP RuleML version to store on the file.
The last step of the creation of the ASP RuleML plug-in is the managing of errors. When a user saves a file using the SimpleEditorXML, if the content of the file contains some syntax or wrong tags errors, they have to be notified to ASPIDE. To do this, we implement the function getErrors() on RuleMLProgramHandler to return a list of error. When some error is detected to the file, the list of errors is updated. ASPIDE will call getErrors() when it needs to update the program error panel.
1.2 Adding more functionalities
The steps that we have shown using the example, represent the typical input plug-in creation scenario for defining simple input plug-ins. However the SDK provides other supporting classes and methods and we explain them in this subsection.
A user can add the new commands by implementing the class CustomMenuItem that contains a function, that has to return the name of the command, and the callBack method defining the action to be done. A current editor can be set to an InputStorageHandler, so that ASPIDE can place it on the GUI when a file assigned to a plugin is open in ASPIDE.
To design an editor for an input plug-in, the class EditorView must be implemented. It contains methods for getting either a JEditorPane (if the editor is a textual editor or a JPanel) (if the editor is something different from a textual editor). The programmer, in this way, can design a custom editor depending on its preferences. Other methods are used to make simpler other features like a selection of a line or a selection of an error.
When an editor is modified, the editing event can be notified to the ASPIDE environment (class AspideEnvironment) so that ASPIDE can do operations associated with this action like the signaling to the user that a file can be saved. Using this set of classes, also other extensions (not mentioned in the example) can be done. In particular, an outline can also be associated to an EditorView so that ASPIDE can also open it when the associated editor is open. To design an outline, the class EditorOutline must be implemented; it contains a method that returns a JPanel that ASPIDE will use as outline and will place to the outline container. Note that each outline can be associated to many editors.
2. Creating a Rewriting Plug-in
The goal is to enrich ASPIDE with a new functionality that allows rewriting procedures for rewriting logic programs and generic files written in some format. In particular a rewriting plug-in can deal with an entire file, with a set of files and with a sub program extracted from an ASP file content.
The follow class diagram summarize the interfaces, contained in the SDK, that must be used to create a new rewriting plug-in.
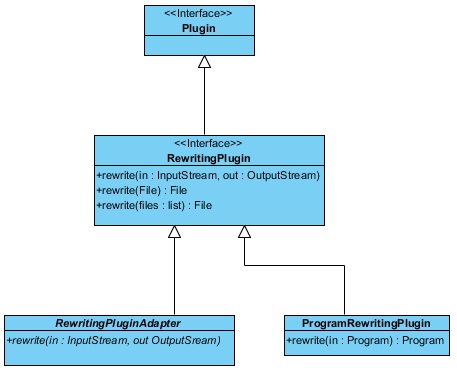
Fig.2. The rewriting plugin interfaces Diagram
To define a new rewriting plugin, we have to create a class that implements the interface RewritingPlugin (fig. 2) . The interface shows three methods used for applying the plugin in different scenarios:
- to deal with an entire file; in this case the file given as output is used by ASPIDE to obtain the result of the rewriting;
- to provide, as input, a set of files, also in this case the result will be rewritten in a file that is given as input;
- to allows one to use an InputStream of ASP code (usually correspond-ing to some rules selected in the editor) that will be rewritten and passed to the OutputStream given as parameter.
We can also exploit the abstract class RewritingPluginAdapter where the methods related to files are already implemented with default behaviors. Consequently the only method that must be defined is rewrite that acts using an input stream and an output stream. In particular we have to read the content from an input stream, making some procedure to it (some rewriting on the input) and to write the result to the output stream.
An
other supporting class is ProgramRewritingPlugin
that provides a rewriting method for rewriting ASP program using the
object Program provided
by the DLVWrapper.
3. Creating an Output Plug-in
The goal is to handle the solver output, generated on the execution process and to write it in a new format. The output can be used for many purposes like: (i) redirecting it to some other solver, (ii) a translating to some other output format to be shown in output console or giving the possibility to show it in a new user-defined window.
The follow class diagram summarize the interfaces, contained in the SDK, that must be used to create a new output plug-in. In the next we exploit an example for creating an output plug-in. In particular we give by a step-by-step description for the creation of the ASPIDE Custom XML Output Converter plug-in (already available in this page; see description of the plug-in for more details).
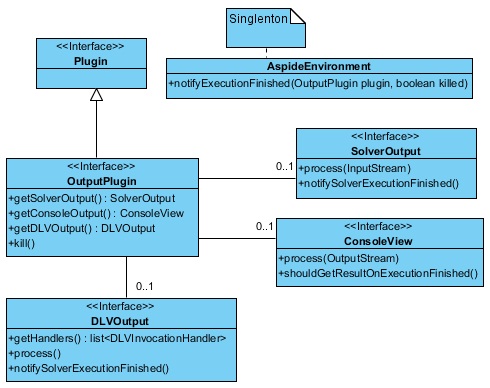
Fig.3. The output plugin interfaces Diagram
We start by designing the class CustomXMLOutput that implements the class OutputPlugin (fig. 3). This class allows to:
- capture the answer sets of the DLV solver;
- rewrite the answer sets in the XML format;
- print the result to the Console Window;
- notify ASPIDE that the execution is finished and the showing of the Console Window is possible.
by means of Java objects. When the DLV Wrapper executes the solver, it passes, to its registered handlers, models, predicates and so on. Using the DLVOutput interface (fig.3) we can register new handlers to the DLV Wrapper; to do this we create a class WrapperConsole that implements DLVOutput and we override the corresponding function getHandlers as follows:
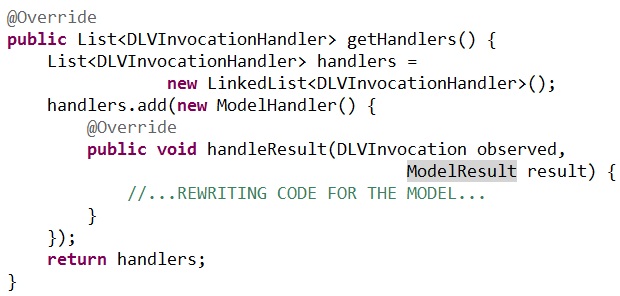
ModelResult represents a DLV Model that we can use to our handler to make the rewriting procedure. When the execution of the solver is finished, ASPIDE calls the method notifySolverExecutionFinished of DLVOutput, so we can implement this to do some final operation like the ending of the rewriting process.
When the DLV Wrapper has finished to interpret the output, and the plugin has finished the rewriting process, the results have to be written on the Console Window of ASPIDE. To this end, we make the same class WrapperConsole to implement also ConsoleView. We override the method process(OutputStream) making it to write the custom XML output to the output stream; strings printed to this stream will be printed to the Console Window. We implement also the function shouldGetResultOnExecutionFinished() to return true; acconding to what the function returns, ASPIDE will read the content of the output stream of the function process in different moments:
- only when the plugin has terminated the execution (in case the function returns true);
- every time the solver has passed a model or a text line to the plugin (in case the function returns false);
An other interesting interface that can be exploited is SolverOutput that can be used to capture the pure output stream generated from the solver, so that the plug-in can parse and use for some purpose.
OutputPlugin contains methods that can return, if any, one DLVOutput, one ConsoleView and one SolverOutput. In this case we override both the methods getConsoleOutput and getDLVOutput to return the same instance of WrapperConsole (note that it now implements both ConsoleView and DLVOutput).
4. Deployment of the plug-in
When a
plugin is
ready, the final step that allows the using of it in ASPIDE consists
on preparing a JAR
(Java Archive) file and importing it in the ASPIDE plugin folder. All
compiled classes
that compose a plugin must be stored in the JAR; moreover, in the root
of the JAR
file, you must provide an XML configuration file (called plugin.xml) that
provides
information about the plugin:
<pluginpack
name="plugin-packName" version="v.X" author="Plugin Author">
<plugin name="Plugin-name"
type="input|output|rewrite" class="path.ClassName">
<filetype extension="fileExtension1"/>
<filetype extension="fileExtension2"/>
<lib jarname="jarName.jar"/>
</plugin>
</pluginpack>
An ASPIDE plugin JAR file may contain more than one plugin. For each plugin you must specify a TAG <plugin> in the XML configuration file. Each plugin TAG specifies the name used in ASPIDE, the type (input and/or output and/or rewriting), the version and the author of the plugin. Moreover each plugin can be associated to particular files by defining file extensions that it can manage. Users can exploit external libraries by specifying them in the XML configuration file; during the installation of the plugin, additional libraries will be copied into a common folder of ASPIDE, so that several plug-ins can share additional libraries.
Regarding input plug-ins, icons to associate to InputStorageHandler must be stored to a folder named Utils that must be inserted in the root of the JAR file.